Tuesday, 30 December 2014

Spiral Pendant Tutorial

Spiral Pendant Tutorial


The spiral pendant tutorial is one of my favorite designs.  It is very simple to make but the results can be stunning!  The great thing about this tutorial is that it demonstrates a different wire wrapping technique to give the impression that your beads are bezel set. 

This tutorial is to make a fairly simply designed pendant but one you have the basic technique down you can experiment with your designs. The design can also be easily adapted to make earrings - why not make a matching set?!


To make this particular design you will need:
  1. 7 inches (17 cm) of 20 gauge wire;
  2. 60 inches (150 cm) of 26 gauge wire;
  3. 16 x 2mm round beads; and 
  4. a necklace chain. 
The link to the video is below.  Happy beading!


Inexpensive Ways to Brand and Display Jewelry


Displaying Jewelry for Sale 


Whether you are selling jewelry online or in person, its a great idea to think of yourself as a brand. The way you package your jewelry and display it is incredibly important to making sales. If you don't put effort into presently your jewelry professionally, people may assume that you also don't put effort into making your jewelry!


If you at not nifty with a computer (I'm certainly not!) there are a number of sites that will help you develop a logo.

I have found however that one of the most inexpensive and versatile tools in branding my jewelry has been a custom order stamp that I ordered online.  I use the same stamp on my display cards as I do with my packaging.

You can make your own inexpensive display cards using cardboard paper.  I like to create stand up cards by bending the paper in half.  This works particularly well for selling jewelry at craft fairs.  You can add some height to your jewelry display by laying some cards flat and some standing upright. Using cards that allow the jewelry to stand up adds some movement to the piece and helps people to see what it would look like when worn.


Making your own display cards also means that you can make cards to fit the shape of a particular design.  If you have a particularly large piece of jewelry, you can make sure it is displayed properly. 

To make earring cards, I bend a rectangular piece of card in half and use a pin to make small holes to fit the earring hooks through. To make a necklace display, I use a rectangular piece of card and make a couple of slits in the top which hold the necklace chain in place. 


When it comes to packing your jewelry, I like to use the stamp to create matching packaging.  Even something as simple as a brown paper bag works well!


Saturday, 23 August 2014

Ring with a Twist Video Tutorial


Ready for another ring tutorial?!  This ring is simple to make and the design can be easily adapted to suit your own style. You can use whatever beads you want but smaller (4mm and 2mm) round beads work best.


Materials: 
6 inches (15 cm) of 20 gauge wire;
24 inches (50 cm) of 26 gauge wire;
3 x 4 mm beads; and
8 x 2mm beads.

Tools:
wire cutters;
round nose plier; and
a ring mandrel (optional but will make life a lot easier!)

Watch the video below to see the tutorial:


Monday, 18 August 2014

Paper Beads Tutorial


I love experimenting with different mediums, especially paper! As I have said before, I LOVE traditional origami paper.  I love experimenting to see how I can work beautiful paper into my jewelry designs. Making papers beads is very simple.  They may sound like something you would have made as a child, but the results can be very elegant and totally unique. 


The style of bead you make will depend on how you cut your paper.  The first style I made was by cutting a square piece of paper into triangular strips.  For accuracy, I drew the triangles on the back of the paper. I then cut the paper into triangular strips. 


I then wrapped the paper, starting with the largest section of the paper, around a wooden skewer. It is best to wrap the paper tightly around the skewer for this stage.


Once you get to the end, glue the inside of the last section of the paper and wrap it around the wrapped part of the paper.


Hold the glued section closed for about 30 seconds to allow it to set.


You can change the shape of your beads by changing the way that you cut the paper in the first step.  You can make rectangular strips of paper to make the beads I used to make the earrings above.  Experiment with different shapes of paper to find something totally unique!


Sunday, 10 August 2014

Three Bead Ring


Making rings from wire can be a little daunting but can lead to beautiful results.

To make this three bead ring, you will need:


  1. 24 inches (50 cm) of 28 gauge wire;
  2. 6 inches (15 cm) of 20 gauge wire; and 
  3. 3 x 4mm beads.
I used opaque glass Czech beads with gold plated wire.  

Happy ring making!! 


Saturday, 2 August 2014

Origami Leaf Earrings


I love origami paper - particularly the traditional Japanese designs.  I recently bought a bunch of beautiful paper online and I have been incorporating it into my jewelry designs.

These leaf earrings are very easy to make and look beautiful.

You will need:

  1. once piece of square origami paper (the piece I used was about 5 inches x 5 inches (12cm x 12cm), and the earrings I made were quite large.  You therefore might want to try using a smaller piece of paper if you do not want your earrings to be so dramatic);
  2. 10cm (3.15 inches) of 24 gauge wire; 
  3. 2 earring hooks; and 
  4. a small amount of craft glue. 


The first step, is to cut your square paper in half diagonally.

Next, turn the paper face down.  Fold the largest section of the paper, about 2mm from the edge of the paper.


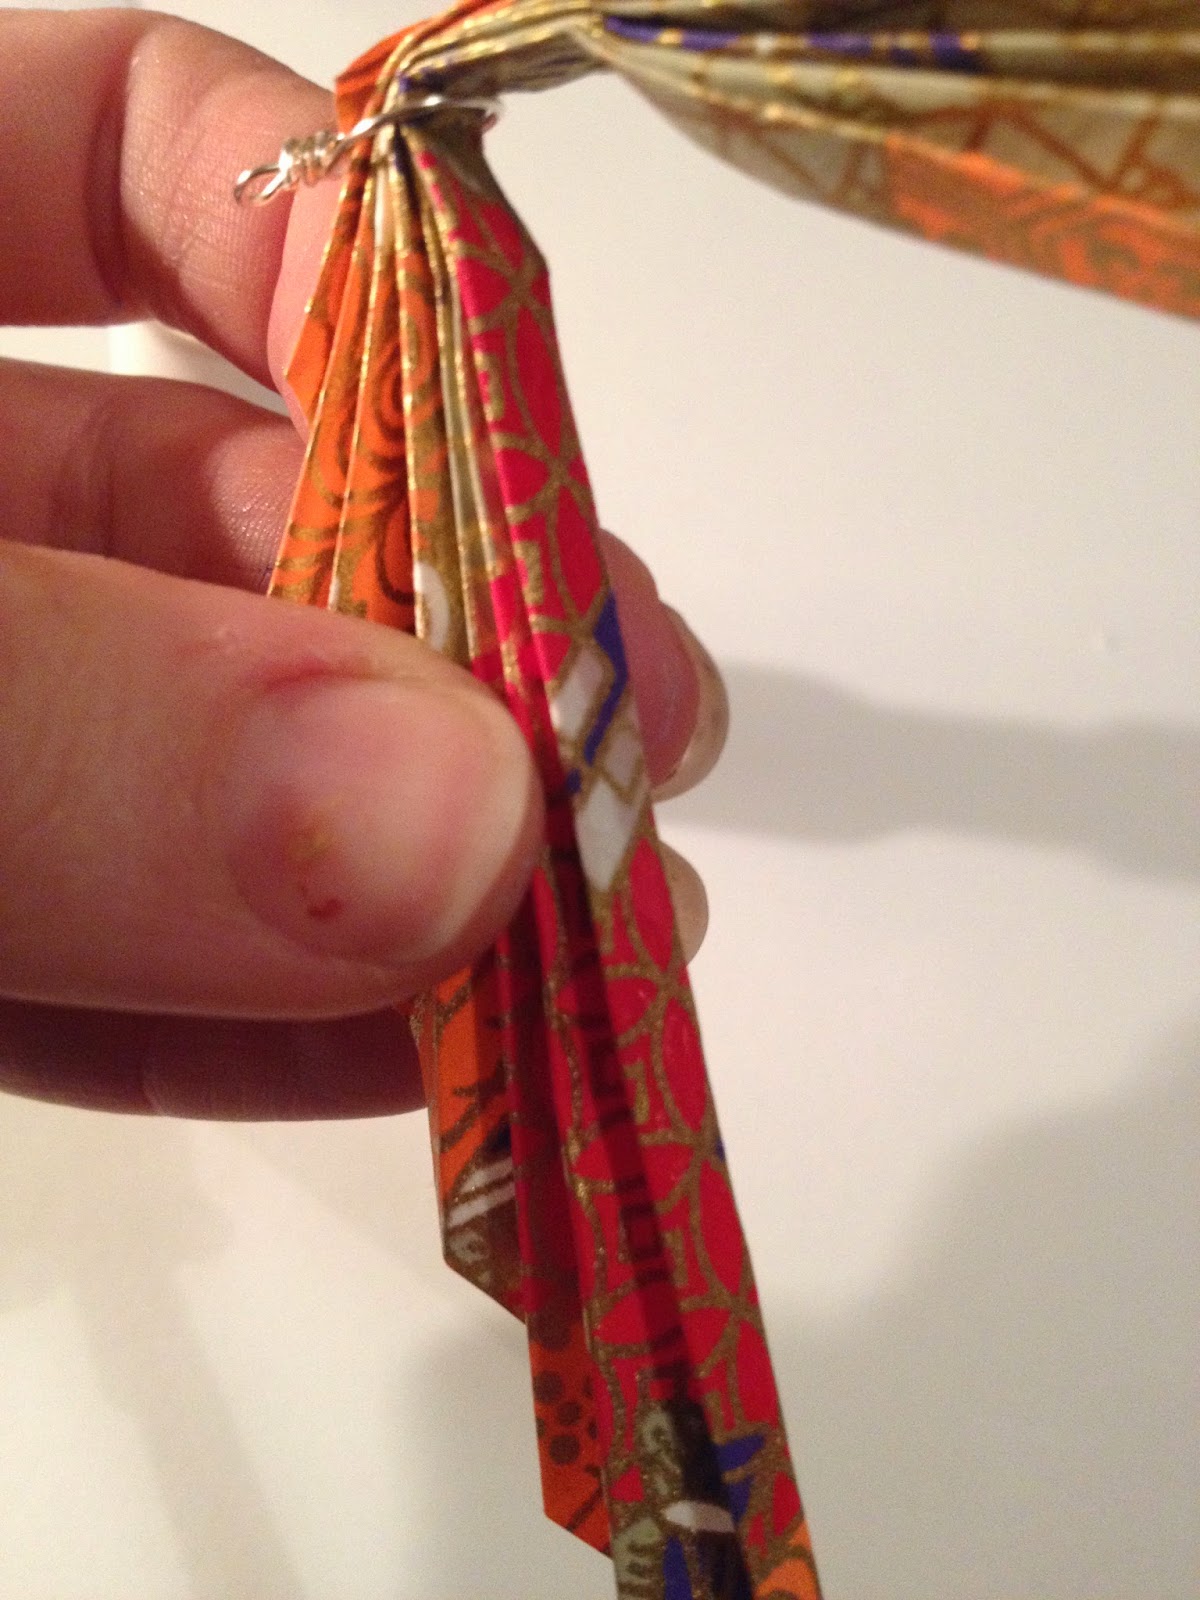
Continue folding the paper, turning it onto the other side every time you do, so that is is folded like an accordion. 


Fold the paper in half, bringing the largest sections of the paper together. 


The next step is to make a wire loop so that you can connect the paper to an earring hook.  You could use a jump ring to do this, but I prefer to make a wrapped loop so that the structure is stronger without the need for solder.  Take a 5cm length of wire, and bend the top of the wire around pliers to make a loop. 


Bend the longer length of wire around the pliers so that you make a second, larger loop. You want the loop to be large enough so that the folded paper can be threaded through it. 


 Wrap the wire twice around the 'stem' wire, towards the top of the smaller loop. Trim the excess wire.


Thread the folder paper through the large loop. The loop should be held in the section where the paper was folded in half. 


Place glue along the edges of the inside of the folded paper.  Make sure not to glue the other folded sections together, otherwise the earrings will not fan out. 


Thread the top small loop onto an earring hook, and your earrings are complete!


You can cover the earrings with Mod Podge or an acrylic spray to make them more durable. 

How to make hair sticks


This is one of my favourite projects. I love hair sticks - I stick one in my bun or wrap my hair around the stick to cover up a bad hair day.

In my experience, hair sticks are very popular with consumers. They are really simple to make, and you can adapt them to suit your individual style.

They are incredibly simple to make.  All you need is:


  1. a pre-drilled hair stick (you can buy them online or you can buy a wooden chopstick and drill the centre)
  2. a couple of beads,
  3. a bead cap; and 
  4. a small amount of super glue. 
The video tutorial is below. I hope you love them as much as I do!


Monday, 28 July 2014

Wire Fringe Necklace


Once you have learned the basics of jewelry making, I highly recommend experimenting with different styles and creating unusual pieces.  Not only is it fun, but, if you want to sell your jewelry, you will find it is a great idea to offer something original and completely unique.  You may not appeal to the mass market, but you may find that a smaller group of people will fall in love with your individual designs.

This necklace is a little different - you can make it as elegant or dramatic as you like. You can see that I have made it into a 'bib' style and added chain.  You could make it longer to create a more dramatic effect.

For this project I used:

  1. 40cm of 24 gauge wire;
  2. 2.5m of 28 gauge wire;
  3. 39 beads;
  4. 1 necklace clasp; and
  5. 18cm of chain.

If you do not want to use chain and want to make the 'fringed' part of your necklace longer (you could make it the entire length of the necklace), then you should allow for up to 3.5m of 28 gauge wire.  How much wire you use will depend on not only the length of the fringed part but also the length of the 'fringes' themselves.

If you would like to know more about the different types of wire used in jewelry making, check out the previous post.

The video tutorial for this project is below - happy twisting!

Saturday, 26 July 2014

Jewelry Making Materials - Wire

Choosing Wire 


There is a lot of choice when it comes to selecting materials, particularly wire.  Below, I have outlined some of the basics which may assist you getting started.

Thickness

Wire is usually described by its 'gauge, being a reference to its thickness.  In some countries, its thickness is referred to in millimeters.  A higher gauge will mean a thinner wire.

Thick wire (16 to 20 gauge or 1.3mm to 0.8mm) is great for making components, like jump rings.  It is also great to use to create a  'structure' like a circle or a square, to base you design around, so it can be particularly useful in making pendants. It is strong and will hold its shape. I used 20 gauge wire to make the bangle on the right.


Medium wire (22 to 24 gauge, or 0.65mm to 0.5mm) is perfect for wrapping beads.  It is flexible but holds its shape fairly well. It is great for making connections between beads, or for wrapping large beads. I used 24 gauge wire to make the necklace on the left.


Thin wire (26 to 28 gauge, 0.3mm to 0.4mm) is great for wire crochet or delicate weaving.  I used (a lot!) of 28 gauge wire to make the twisted vine necklace on the right.  It is also great for filling shapes made from 20 gauge wire (I will be posting a tutorial for that project soon!)


Tiger tail is a thin, flexible nylon wire.  It can't be used for wrapping but can be used with crimp beads for 'floating' earring or necklace projects, like those on the left.


Materials

Wire comes in a number of different types of materials. You should be mindful of the coating of your wire. Some wire, like aluminium wire, is inexpensive but will tarnish in a small amount of time.  Some cheaper wires will also snap when bent (which can lead to some real frustration!). It can be great for practicing (provided that it is fairly strong) but is not ideal for final projects.

Generally, I like to use silver or gold plated wire.  It is not overly expensive, looks great and does not tarnish. It is also really strong - even the thinner wires don't snap after repeated bending.

If you want something even stronger, you may want to try gold or silver filled wire.  It is like plated wire, but the coasting of the gold or silver is much thicker.

If you have any queries at all, let me know and I will do may best to help - email me or comment below.

Happy wrapping!

Basic Techniques: Wire Wrapping Beads

Learning to wrap a bead is one of the most important techniques to learn in jewelry making.  The technique I use allows you to connect beads without using solder.

The tools you will need are pliers and wire cutters.

The first step, is to place the pliers about 1cm from the end of the wire.  Next, bend the wire around the round part of the pliers.


Next, wrap the longer part of the wire around the shorter length twice. 

Pull the wire straight and place a bead on the wire. 

Place the pliers about 1cm away from the bead, and bend the wire around the pliers to make a loop. 


Wrap the wire around the shorter length of wire towards the bead.  Wrap the wire around the 'stem' twice, to make sure it is secure. Trim the excess wire and your bead is ready.


Tuesday, 22 July 2014

Spiral Earrings


These spiral earrings are really easy to make bu look impressive. You can easily convert the design into a pendant (or make a matching pendant for your earrings!)

You can vary the design the make longer styles earrings by using more bead or making your spiral bigger.

All you will need is:


  1. beads of your choice (I used three 4 mm beads)
  2. 30cm of 24 gauge wire; and 
  3. two earring hooks. 
The only tools I used were pliers and wire cutters. 

The link to the full tutorial is below - so get spiralling!


Saturday, 19 July 2014

Two ways of using ribbon in your jewelry designs


Have you thought about using ribbon in your jewelry designs?  Often you can create a dramatic impact.  I have outlined two fairly simple projects below to get your creative juices flowing. I have used simple black ribbon in both these projects but I expect that using something a little different may lead to some beautiful and unique designs.

Ribbon Necklace 

For this project I used:

  1. 14 6mm beads (I used glass pearls);
  2. 50cm of 24 gauge wire;
  3. 60cm of ribbon; and 
  4. a necklace clasp (I used a lobster clasp).
The only tools needed are a pair of round nose pliers and wire cutters.

Step 1: The first step is to make a large wire wrapped loop.  You will want it to be larger than usual so that the ribbon will fit in the loop at the end. 

To make the loop, you first need to wrap the wire around the larger part of the pliers. 


Then, you will need to wrap the longer part of the wire twice around the straight part, so that you create a closed loop.

Trim the shorter part of the wire, and your loop should look like this:


Step 2: the second step is to create a chain of connected beads. You could connect the beads by soldering jump rings between each.  However, I did it by connecting each bead to the proceeding bead. This creates a strong chain without the need for soldering.  

Place a bead on the length of wire. Place the pliers about 1cm away from the bead, and bend the wire towards the bead.  


To close the link, wrap the wire twice around the shorter part of the wire, towards the bead.  After you have wrapped the wire twice, trim the end of the wire. 


To complete the chain, continue connecting the beads in the same way.  Bend the wire and make a lop through the loop in the last beaded section. Place a bead on the wire, and close the loop.  Complete the process until you have connected all but one of the beads. 


When it comes time to attach the last bead, use the pliers to make a larger loop, the same size as the loop before the first bead.  You want this loop to be larger so that the other end of the ribbon can fit through it. 


Step three: The third step is to add the ribbon to the beaded chain by threading it through the larger loops on each side.  

You can do this by simply knotting the end of the ribbon, and trimming any excess.  If you do that you design will look like this:


Alternatively, you might you might want to create ribbons in the ends like this:


If you want the necklace to be adjustable, you can cut the ribbon so that you can tie a bow around your neck.


Ribbon Bracelet

This project is another example of using ribbon in your designs.  This design using ribbon to create an 'accordion' look.  I have made a bracelet but you could easily turn the design into a necklace. 

For this design I used:

  1. 21 6mm beads (I used the same glass pearls);
  2. 20cm of 24 gauge wire; and 
  3. a clasp. 
The only tools I used were a pair of pliers and wire cutters. 

Step one: The first step to to make a look in your wire.  Use the pliers to create a loop and bend the wire around the straight part of the wire.  Trim the end of the wire. Use the wire to pierce the ribbon. 


Bend the ribbon over and pierce the wire through it.  You should have a small loop of ribbon sitting on top of the wire.  


Thread a bead onto the wire.


Fold the ribbon around the bead and  pierce the wire through it. Fold the ribbon over the piece the wire through it again.


 Keep adding beads and threading the ribbon onto the wire in the same way until all the beads and the ribbon are threaded onto the wire.

 When the last bead has been added, add a clasp before closing the loop.


You can see from my design that the ribbon tends to overpower the beads.  If you want your beads to stand out more, make the loops in the ribbon smaller.


Do you use ribbon in your designs?  If so, share your ideas by commenting below!